You have two possibilities: choosing a maximum render time limit (in minutes) or a maximum Sampling Level (SL), depending on your preferences. If you are on a deadline, you will probably want to get the best quality image in a given time. For instance if you have around two hours you can enter “120” in the “Render phase time limit” field and 30 in the “Sampling Level” field. The render phase will then be interrupted after 2 hours, or after a sampling level of 30 is reached (which is not likely ).
Another strategy: you want to get to a sampling level of N (for instance N=15), which you consider necessary and sufficient for your needs. In that case you could enter 120 minutes (the maximum time authorized) and 15 in the SL field. The render will then stop when the desired SL is reached. You must always use this strategy when you render an animation, to ensure that all frames are of the same quality.
If you are not too sure, for instance you would like a SL of 16 but it is not mandatory, and in any case you do not want to exceed a 1 hour render phase time, you would enter “60” and 16”. In that case the render phase will be stopped as soon as the 60 minutes limit is reached, OR a SL of 16 is reached.
Please note that the total time of a project, which determines its total cost, includes several factors (the example below is for a cooperative project):
The time needed to send the scene to all the nodes. This is quick, generally less than one minute with most scenes, and several minutes with complex scenes.
The preparation time (the voxelization can take a while on complex scenes).
The render time (the longer part obviously, which you specify the length in the Submit Project form).
The time needed to gather and merge all the MXIs into the final MXI. It depends on the MXI sizes (see MXI complexity and processing time section below).
The time to create your temporary ftp account and transfert the files (typically less than one minute).
Important : We recommend that you use RANCHecker to better estimate the total cost of your project.
Important: MXI complexity and processing time
The final MXI file is obtained by gathering and merging the cooperative MXI files from all the RANCH Runner nodes. The complexity of a MXI file depends on the resolution of the project, the use or not of the Multilight option, the number of light emitters and channels. The gathering time (copying the MXIs from all the nodes across the network) and the merging time (the fusion of all these MXIs into the final MXI) depend on the complexity of each MXI.
With large MXIs, a huge amount of data must be transferred back and forth across the network, and the time required for the gathering + merging phase can be quite long. That being said, the RANCH Runner offers the highest level of merging performance available today. The merging time on the RANCH Runner typically takes between 2 and 20 minutes depending on the project complexity.
Warning:
Merging has changed since version 2.7 of Maxwell Render. Please make sure you have read the details on the supported versions page.
If you check the “Multilight” option when saving your scene, the MXI sizes will be much bigger, and processing time will increase accordingly. Please be very careful when using the Multilight option, and be aware that it can considerably increase the total processing time of the project, even if the render time itself is small.
If you absolutely need to use the Multilight features of Maxwell Render, try to avoid Color Multilight, as it can generate huge MXIs that can eat a lot of RAM and take a very long time to merge.
Files produced by the render
If your project is a still image / cooperative render
You will find in the ftp directory of your project:
your original .VUM file.
the final MXI merged after the cooperative render.
bitmap layers you specified in your scene (alpha, IDmaterial, IDmesh, etc.)
a final image of your project (with the suffix “_final”).
a “denoised” version of the final image (with the suffix “_denoised”). The final image file is automatically filtered at the end of the RANCH process in an attempt to reduce the amount of digital noise in the picture.
Note 1: the effects of the “denoising” are subtle. It will never replace a longer render time, and it will never transform a supergrainy image in a perfect image , but it can help to “clean” the final picture by removing some of the noise. The denoising pass is very fast and done at no extra cost for the customer.
Note 2: on some images the denoiser may fail. In that case the “_denoised” image will not be present in the directory. As it is an automated process, the denoising phase cannot be as refined as if you had denoised the image manually, and in some rare circumstances it won’t work. Please consider this feature as a bonus free of charge, not as a guaranteed result.
If your project is an animation
You will find in your directory:
your original .VUM file.
all the frames of your animation, saved in the bitmap format you chose in the scene. If for any reason the bitmap output format is not identified, the 32-bit TIF format will be used.
bitmap layers you specified in your scene (alpha, IDmaterial, IDmesh, etc.).
The real time preview
The cooperative project preview (still image)
The RANCH lets you check visually your cooperative project while it is being rendered, on a web page specific to your project in progress. To access this page, click on the PREVIEW button in the waiting/priority list.
Below is an example of a preview image.
Notes :
The first preview is available 5 to 6 minutes after the beginning of the project.
The preview does not show all the subtleties of the final image.
The preview image has a maximum definition of 1400 pixels (wide or high).
The preview is annotated (project name, current SL, render time, real image definition).
The preview is generated with each SL increase.
You can click on the REFRESH button to update the preview.
The animation preview
The RANCH offers you a very handy feature for checking visually your animation project when it is being rendered. It displays 256-pixel wide thumbnails of every tenth frame rendered (frames 0, 10, 20, etc.) on a web page specific to your inprogress project. To access this page, you just have to click on the PREVIEW button which appears when your project is being rendered (and of course if there is something to preview: if each frame of your animation takes 30 minutes to render, obviously there will be nothing to see during the first 30 minutes 🙂
Below is an example of what you will be able to see when you click on Preview (the preview image is always around 1900 pixels wide, its height depends on the number of thumbnails).
Notes: at the end of the render, the animation preview image is copied in your project’s directory.
The MultiCam mode
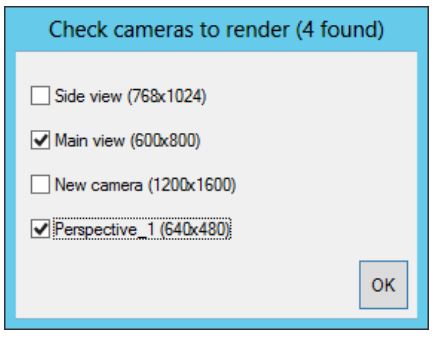
In some projects, you may have to render several views of the same scene. The MultiCam mode (integrated in RANCHecker >= 2.2) lets you select the cameras you want to render:
And then writes this information in the .vum archive. When the project is processed, all the cameras you checked will be rendered one after the other, so you won’t need to send as many projects as you have views to render. If there is only camera in the project, the above requester won’t appear when you prepare your project.
Things to know about the MultiCam mode:
if you check only one camera to render, the X/Y definition used when rendering will be the one you enter in the Submit Project form on the RANCH web site
if you check at least two cameras to render, the X/Y definition used for a camera when rendering will be the definition saved for this camera in the .mxs scene
each camera is rendered in its own subdirectory in the project directory
each camera can have a different definition (width/height)
if you cancel your project while it is rendering, the whole project will be canceled, not only the current camera.
the waiting list will display “CAM 2/4” for instance if the currently rendered camera is the second camera out of four.
the list of selected cameras is displayed in the e-mail sent when the project starts
the SL reached by each rendered camera is displayed in the end project e-mail
the preview (see appendix A) works with each camera successively
resuming a MultiCam project is not possible, even if only one camera is selected.