

Documentation

Render Layers
We support the rendering of the Render layers of your main scene on the RANCH farm based on the render Setup. Legacy render layer could not render properly.
For your convenience, please install and use RANCHSync additionnally to the RANCHecker.
Before
In the previous versions, all the Layers were rendered under the same project ID.
This method gave you all the images in a single folder and to have only one project to monitor.
Though, it had the disadvantage to skewing the display of rendering time, and if your project stopped due to overdraft, the missing frames could be unequal between layers.
So users had 2 possibilities:
- Reused the archive with all the layers to render the missing frames with the risk to render some layers twice.
- Create new archives with one activated layer each and send them in different projects ID and frames ranges.
Moreover, Redshift had an erratic behaviour and did not always render the layers properly.layers.
Now
Since version 5.0.29 of the RANCHecker, we have changed the management system of the Render layers on the RANCH to optimize your rendering. It also resolve the erratic behaviour of Redshift.
You do not have to change the way you work, the RANCHecker and RANCHSync do all the job!
Workflow
When your scene with your layers is finalized and fully set up, you can create the archive with the RANCHecker and with RANCHSync open (even in the background).
Once your VUA is created, the “Submit” button will become active so you can upload your project.
Each Render Layer will be send under differents projects IDs and name.
Naming example:
Figure out a scene named MyAnimation_V01.mb containing 3 activated layers in this order: BG , Character , Vegetations
4 projects will be created with the following names:
- ML_MyAnimatio –> for the Master layer / Default Layer
- BG_MyAnimatio –> for the BG layer
- Character_MyAnimatio –> for the Character layer
- Vegeta3_MyAnimatio –> for the Vegetations layer because it is named with more than 9 characters

Only the first activated layer will be rendered if you upload the archive created on you pc directly through the website.
The layers’s order is defined by Maya and displayed in the Hypershade (Rendering tab).
Just as you cannot render more than 20 different projects in parallel on the farm, if you have more than 20 layers (including the Master Layer) only the first 20 will be rendered.
Special Case
Referenced scene also have layers, at least the “defaultRenderLayer”.
Those layers are not visible in the Render Setup of the main scene but can be counted in Hypershade > Rendering tab.
They stay as well in the scene even if you import the reference.
If the “namespace” of those referenced layers end by “:”, the layers will not create a project ID.
On the other hand, if there is no “namespace” or if it not ending by “:”, a project ID will be created for those layers and will start the validation process.
The system should reject them but we highly recommend to disable them from Hypershade by unchecking “Renderable”.
Re-render a layer with different parameters
You can re-used the different layers archives from your dashboard. However, this information is not inside the archive and require to use the parameter“Layer to Render” to be sure to render the proper layer .
If you do not use it, the first activated layer will be rendered instead. Warning, the layers order in Maya is not the Render Setup one but that one of the “Rendering” tab of Hypershade.
- Select the project of your layer and copy the name of the layer
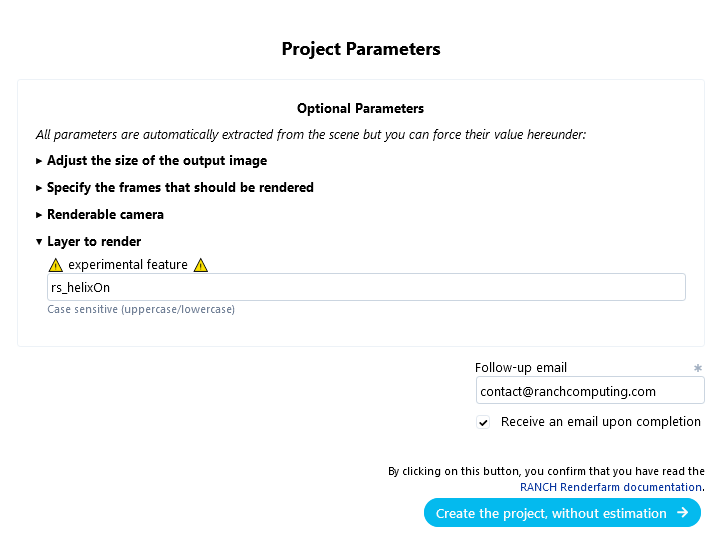
- Click on Submit again > with different settings
- Open the optional parameter “Layer to render ” and paste the layer name
- Open the parameter “Specify the frames that should be rendered” and write the frame range OR let the field empty if the frame range was set in the render settings of your Maya scene.
- Click on sur “Create project”, chooose the priority, go to the “Re-used already uploaded tab” and select the right project.
Example:
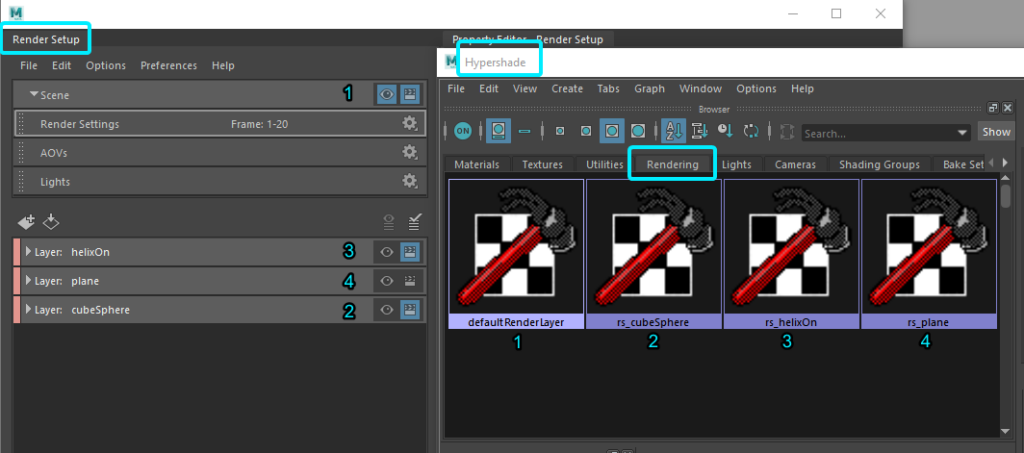
Here, you can see that the layer’s order and name are not the same between the Render Setup and the Hypershade. The real name of the layers is the Hypershade one.
To render “helixOn” layer from your dashboard, you have to write “rs_helixOn” or “helixOn”. Though, for telling the system that you want to render the masterLayer, only “defaultRenderLayer” will work.
Beware the letter case: rs_HelixOn, helix0n, helixon, Helixon, rs_Helixon,… won’t render the layer in this example.
The masterLayer is not always the 1st layer of the scene layer.
Overrides on layers
Do not set override on the render settings, especially on Frame Range. This could increase the rendering time.
If you want to have a specific frame range on a layer deactivate the others layer and use the RANCHecker option “Specify frames”.
Or use the web dashboard option “Specify the frames that should be rendered” and “Layer to render”.